How to connect Docker containers across multiple hosts with WireGuard

You want your Docker containers to talk to each other, but they're running on different machines. Perhaps across different cloud providers or mixing cloud with on-prem. The usual approach of mapping services to host ports quickly becomes a pain. Worse, if they're on the public internet, you need to secure every exposed endpoint with TLS and auth.
What if your containers on different machines could communicate directly without exposing any ports? Using their private Docker IPs, as if they were on the same machine. Here's how you can use pure WireGuard and some clever networking tricks to make this work.
What we're building
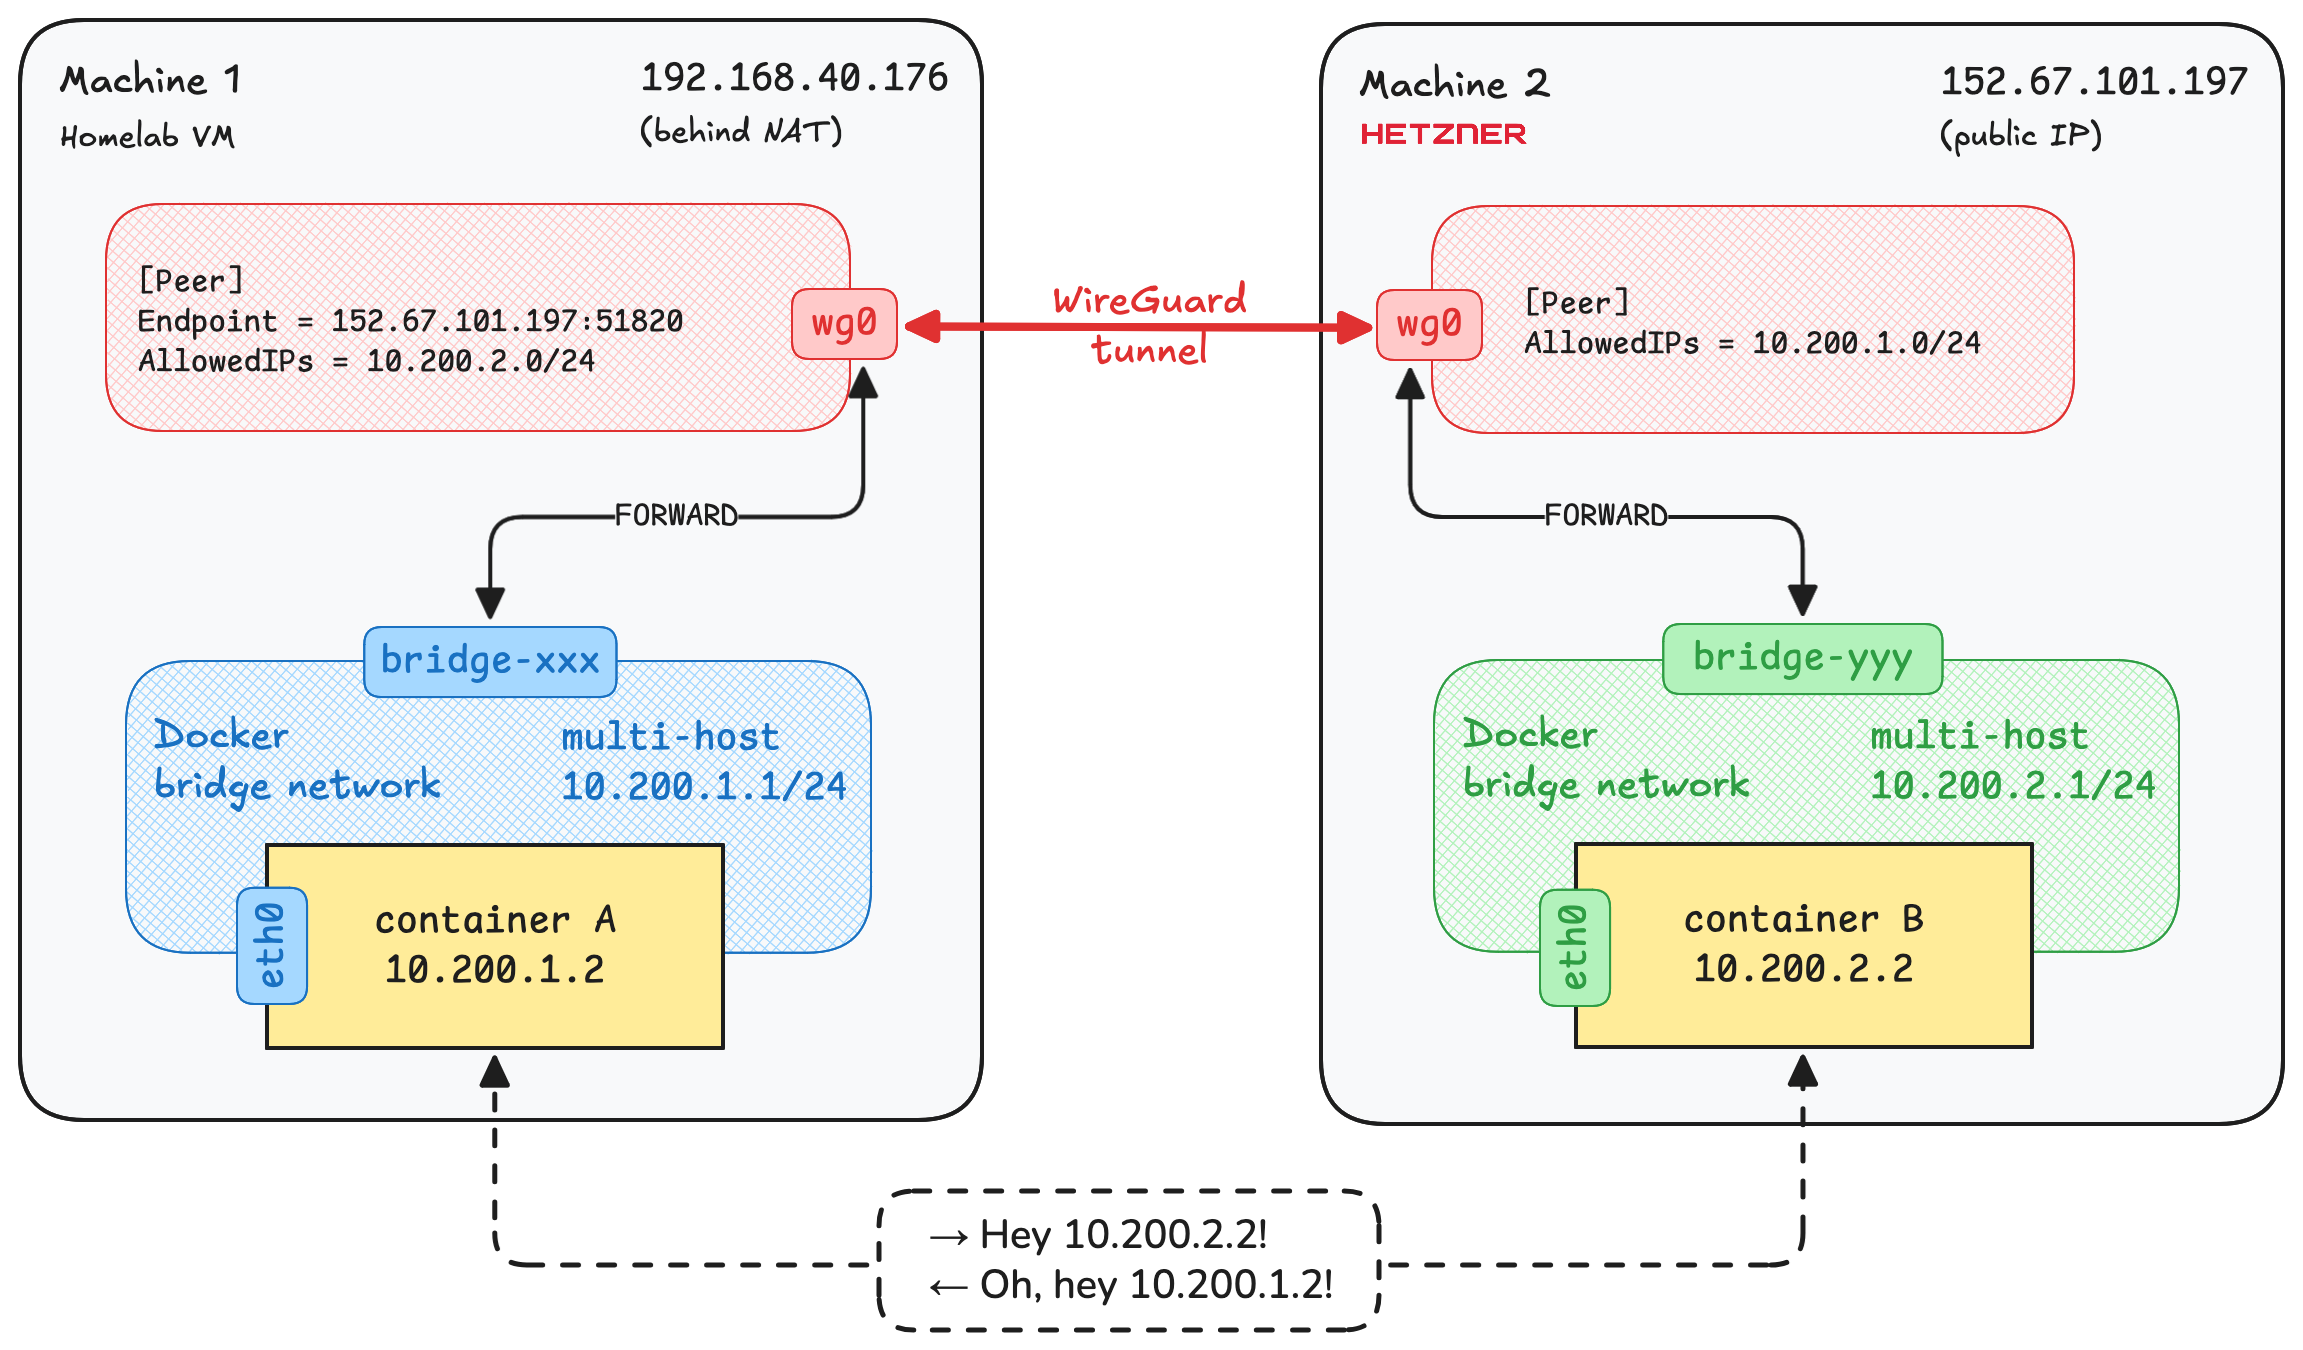
Docker containers are typically connected to a bridge network on their host machine, which allows them to communicate with each other. A bridge network also provides isolation from containers not connected to it and other networks on the host. What we want to achieve is connecting these bridge networks across machines so that containers on different machines can communicate as if they were connected to the same local bridge network.
The incantation we need is called a site-to-site VPN. Any solution would work. Moreover, if the machines are on the same local network, they're already connected and only lack the appropriate routing configuration. But I'll describe a more versatile approach that works even when the machines are on different continents or behind NAT. WireGuard is the ideal solution for this use case: it's lightweight, fast, simple to configure, provides strong security and NAT traversal.
We'll create a new Docker bridge network multi-host on each machine with unique subnets. Then establish a secure
WireGuard tunnel between the machines and configure IP routing so that multi-host bridge networks become routable via
the tunnel. Finally, we'll run containers on each machine connected to the multi-host network and test that they can
communicate with each other using their private IPs.
I will use these two machines:
- Machine 1: Debian 12 virtual machine in my homelab network in Australia, which is behind NAT
- Machine 2: Ubuntu 24.04 server from Hetzner in Finland that has a public IP
Prerequisites
- Basic knowledge of Docker networking and WireGuard. If you're new to these topics, you might want to read up on them first.
- At least two Linux machines with root access and Docker installed. They should be on the same network or be able to communicate over the internet.
Step 1: Configure Docker networks
Most of the commands in this guide require root privileges. You can run them with sudo or log in as root. I'll start
root shells on both machines with sudo -i for convenience.
We can't connect the default Docker bridge networks across
machines because they use the same subnet (172.17.0.0/16 by default). We need them to have non-overlapping addresses
so that we can set up routing between them later.
Therefore, let's create new Docker bridge networks on each machine with manually specified unique subnets. You can
choose any subnets from
the private IPv4 address ranges
that do not overlap with each other or with your existing networks. I'll use 10.200.1.0/24 and 10.200.2.0/24
for Machine 1 and Machine 2, respectively. They don't even need to be sequential or be part of the same larger network.
However, using a common parent network (like 10.200.0.0/16 in my case) can simplify firewall rules and make it easier
to manage more machines later.
You can use any name for the Docker networks. I'll call them multi-host for clarity.
# Machine 1
docker network create --subnet 10.200.1.0/24 -o com.docker.network.bridge.trusted_host_interfaces="wg0" multi-host
# Machine 2
docker network create --subnet 10.200.2.0/24 -o com.docker.network.bridge.trusted_host_interfaces="wg0" multi-host
Starting with Docker 28.2.0 (PR), you have to explicitly specify from which
host interfaces you
allow direct routing to containers
in bridge networks. This is done by specifying the com.docker.network.bridge.trusted_host_interfaces option when
creating the network. In our case, we want to allow routing via the WireGuard interface wg0 that will be created in
the next step.
Provide this option even if you're using an older Docker version, as it'll be required if you upgrade Docker in the future.
Step 2: Connect Docker networks with WireGuard
By default, WireGuard uses the UDP port 51820 for communication. To establish a tunnel, at least one of the machines needs to be able to reach the other's port over the internet or local network. Please make sure it's not blocked by a firewall on both machines.
For example, when using iptables, you can allow incoming UDP traffic on port 51820 with the following command:
iptables -I INPUT -p udp --dport 51820 -j ACCEPT
Install WireGuard utilities and generate key pairs on both machines:
apt update && apt install wireguard
# Change the mode for files created in the shell to 0600
umask 077
# Create 'privatekey' file containing a new private key
wg genkey > privatekey
# Create 'publickey' file containing the corresponding public key
wg pubkey < privatekey > publickey
Create WireGuard configuration files using the generated keys.
On Machine 1, create /etc/wireguard/wg0.conf:
[Interface]
ListenPort = 51820
PrivateKey = <replace with 'privatekey' file content from Machine 1>

[Peer]
PublicKey = <replace with 'publickey' file content from Machine 2>
# IP ranges for which a peer will route traffic: Docker subnet on Machine 2
AllowedIPs = 10.200.2.0/24
# Public IP of Machine 2
Endpoint = 157.180.72.195:51820
# Periodically send keepalive packets to keep NAT/firewall mapping alive
PersistentKeepalive = 25
On Machine 2, create /etc/wireguard/wg0.conf:
[Interface]
ListenPort = 51820
PrivateKey = <replace with 'privatekey' file content from Machine 2>

[Peer]
PublicKey = <replace with 'publickey' file content from Machine 1>
# IP ranges for which a peer will route traffic: Docker subnet on Machine 1
AllowedIPs = 10.200.1.0/24
# Reachable endpoint of Machine 1
# Endpoint =
# Periodically send keepalive packets to keep NAT/firewall mapping alive
PersistentKeepalive = 25
Refer to the Unofficial WireGuard Documentation for more details on the configuration options.
Note that the Endpoint option could be omitted on one of the machines if the peer is not reachable from that machine.
In my case, Machine 1 is behind NAT in my private homelab network which is not reachable from the remote Hetzner
server (Machine 2). The bidirectional tunnel can still be established in this case but Machine 1 must initiate the
connection.
If both of your machines are reachable from each other, you should specify the Endpoint option in both configs which
will allow them to establish the connection without waiting for the other side to initiate it. If both of your machines
are behind NAT, see NAT to NAT Connections for more
information.
Note also that we don't set the Address option in the configs because we don't want to assign any IP addresses to the
WireGuard interfaces. We want the tunnel to only encapsulate and transfer packets from the multi-host bridge networks
and don't want either end of it to be the destination for the packets.
As the key pairs are now specified in the configuration files, you can remove the privatekey and publickey files on
both machines:
rm privatekey publickey
Now start the WireGuard interface wg0 on both machines:
wg-quick up wg0
Verify that the tunnel is up and running on any of the machines:
$ wg show
interface: wg0
  public key: 4P6scLYcHdgwU8tMkQYGjq6pu4KvrwKyKIg7JuP6E30=
  private key: (hidden)
  listening port: 51820

peer: 0WDgQ+XkHkODI+3xT4APiI9GJS7MvjGH6wtk+W57TgM=
  endpoint: 157.180.72.195:51820
  allowed ips: 10.200.2.0/24
  latest handshake: 12 seconds ago
  transfer: 124 B received, 624 B sent
  persistent keepalive: every 25 seconds
If you see the latest handshake time updating, it means the tunnel is working correctly.
Step 3: Configure IP routing
You've established the WireGuard tunnel, but packets between containers won't flow yet. You need to configure IP routing between the tunnel and the container networks.
Docker daemon automatically enables IP forwarding in the kernel when it starts, so you don't need to manually configure
net.ipv4.ip_forward with sysctl.
The challenge is that Docker blocks traffic between external interfaces and container networks by default for security
reasons. You need to explicitly allow WireGuard traffic from wg0 interface to reach your containers via the
multi-host bridge interface. Docker uses iptables, so you can allow this traffic by adding a rule to the FORWARD
chain before any other Docker-managed rules that would drop it.
Fortunately, Docker creates a special DOCKER-USER chain exactly for this purpose. It's processed before other
Docker-managed chains, allowing you to add custom rules that won't be overridden by Docker.
To create the required iptables rule, you need to find the bridge interface name for the multi-host network you
created earlier. It's named br-<short-network-id>, where <short-network-id> is the first 12 characters of the
network ID.
Add the iptables rule to allow traffic from wg0 to multi-host bridge on Machine 1:
$ docker network ls -f name=multi-host
NETWORK ID     NAME         DRIVER    SCOPE
661096b2a5d9   multi-host   bridge    local
$ iptables -I DOCKER-USER -i wg0 -o br-661096b2a5d9 -j ACCEPT
Add the iptables rule to allow traffic from wg0 to multi-host bridge on Machine 2:
$ docker network ls -f name=multi-host
NETWORK ID     NAME         DRIVER    SCOPE
48f808048e7c   multi-host   bridge    local
$ iptables -I DOCKER-USER -i wg0 -o br-48f808048e7c -j ACCEPT
The traffic in the other direction (from multi-host bridge to wg0) is not blocked by Docker by default. But it still
won't be able to make it through the tunnel. The reason is that Docker creates a MASQUERADE rule in the nat table
for every bridge network with option
com.docker.network.bridge.enable_ip_masquerade set
to true (which is the default). In my case, the rule looks like this on Machine 1:
POSTROUTING -s 10.200.1.0/24 ! -o br-661096b2a5d9 -j MASQUERADE
This essentially configures NAT for all external traffic coming from containers which is necessary for allowing them to
access the internet and other external networks. However, it equally applies to the traffic going through the wg0
interface. It tries to masquerade the source IP address of the packets with the IP address of the wg0 interface and
fails because the wg0 interface doesn't have an IP. This results in the packets being
dropped.
You could assign an IP address to wg0 but this would cause the following unwanted side effects:
- Containers from other Docker networks on the same machine could route through the tunnel to reach remote
multi-hostcontainers, violating Docker's network isolation model. - Remote containers would see all connections as coming from the
wg0IP instead of the actual container IPs.
Let's instead add another rule to the POSTROUTING chain in the nat table to skip masquerading for the traffic from
the multi-host network going through the tunnel.
Run on Machine 1:
iptables -t nat -I POSTROUTING -s 10.200.1.0/24 -o wg0 -j RETURN
Run on Machine 2:
iptables -t nat -I POSTROUTING -s 10.200.2.0/24 -o wg0 -j RETURN
Step 4: Testing
Now you can finally run containers on both machines connected to their multi-host networks and test that they can
communicate.
Run a whoami container on Machine 2 which listens on port 80 and replies with the OS information and HTTP request that it receives:
docker run -d --name whoami --network multi-host traefik/whoami
Get its IP address:
$ docker inspect -f "{{range .NetworkSettings.Networks}}{{.IPAddress}}{{end}}" whoami
10.200.2.2
Now fetch http://10.200.2.2 from inside a container on Machine 1.
Drum roll, please! 🥁
$ docker run -it --rm --network multi-host alpine/curl http://10.200.2.2
Hostname: bdb55fc9d9ae
IP: 127.0.0.1
IP: ::1
IP: 10.200.2.2
RemoteAddr: 10.200.1.2:37682
GET / HTTP/1.1
Host: 10.200.2.2
User-Agent: curl/8.14.1
Accept: */*
Yay, it works! The request came from the container 10.200.1.2 on Machine 1 and was served by the container
10.200.2.2 on Machine 2.
You can ping remote containers or use any other network protocols to communicate with them:
$ docker run -it --rm --network multi-host alpine:latest ping -c 3 10.200.2.2
PING 10.200.2.2 (10.200.2.2): 56 data bytes
64 bytes from 10.200.2.2: seq=0 ttl=62 time=301.294 ms
64 bytes from 10.200.2.2: seq=1 ttl=62 time=297.191 ms
64 bytes from 10.200.2.2: seq=2 ttl=62 time=297.285 ms
Both hosts have IPs assigned to the multi-host bridges, 10.200.1.1 and 10.200.2.1 respectively, which should also
be reachable from the containers or hosts on both machines.
You can see from the ping command the latency is quite high (~300 ms) in my case because the packets have to travel
from Australia to Finland and back. You should take this into account when planning to run latency-sensitive
applications across machines in different regions. As my friend
Sergey once said, "sucks to be limited by the speed of light tbh".
Step 5: Make the configuration persistent
To ensure this setup survives reboots, you need to:
- Persist iptables rules.
- Automatically start the WireGuard interface on boot.
Persisting iptables rules
You can use the iptables-persistent package to save and restore iptables rules on boot. But a more reliable way would
be to use PostUp and PostDown options in the WireGuard configs to automatically configure iptables when WireGuard
starts/stops.
Append the following lines to the [Interface] section in /etc/wireguard/wg0.conf. Make sure to replace
<network-id> with your actual Docker network ID from Step 3. The %i is replaced by
WireGuard with the interface name (wg0).
On Machine 1:
[Interface]
...
PostUp = iptables -I DOCKER-USER -i %i -o br-<network-id> -j ACCEPT; iptables -t nat -I POSTROUTING -s 10.200.1.0/24 -o %i -j RETURN
PostDown = iptables -D DOCKER-USER -i %i -o br-<network-id> -j ACCEPT; iptables -t nat -D POSTROUTING -s 10.200.1.0/24 -o %i -j RETURN
On Machine 2:
[Interface]
...
PostUp = iptables -I DOCKER-USER -i %i -o br-<network-id> -j ACCEPT; iptables -t nat -I POSTROUTING -s 10.200.2.0/24 -o %i -j RETURN
PostDown = iptables -D DOCKER-USER -i %i -o br-<network-id> -j ACCEPT; iptables -t nat -D POSTROUTING -s 10.200.2.0/24 -o %i -j RETURN
Start WireGuard on boot
The wireguard-tools package provides a convenient systemd service to manage WireGuard interfaces. Since our iptables
rules should have priority over Docker's rules, WireGuard must start after Docker.
Create a systemd drop-in configuration for this:
mkdir -p /etc/systemd/system/[email protected]/
cat > /etc/systemd/system/[email protected]/docker-dependency.conf << EOF
[Unit]
After=docker.service
Requires=docker.service
EOF
Then enable the WireGuard service to start on boot:
systemctl enable [email protected]
systemctl daemon-reload
# Verify the unit includes the drop-in configuration
systemctl cat [email protected]
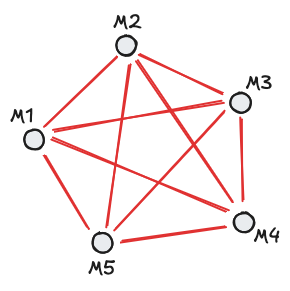
Scaling beyond two machines
Adding a third machine means following the same steps as above on it and updating WireGuard configs on all existing
machines. Each machine needs a [Peer] section for every other machine in the network. With 5 machines, that's 4 peer
entries per config file or 20 peer configurations total that establish a full mesh topology.
Limitations
DNS resolution
The main limitation of this setup is that containers can't find each other by name across machines. You need to use their IP addresses directly or implement a service discovery solution like Consul or CoreDNS.
For small deployments, you can assign static IPs to containers and use those IPs in your app configuration. But service discovery is essential for larger and more dynamic deployments.
NAT traversal constraints
For WireGuard connections to work, at least one machine in each pair must be publicly reachable. The connection fails if both machines are behind NAT. While solutions exist (STUN/TURN servers, UDP hole punching), they're beyond the scope of this guide.
Common scenarios that work:
- ✅ Cloud VPS (public or private IP) ↔ Cloud VPS (public or private IP). Both can use private IPs only if they're in the same cloud provider's network
- ✅ Homelab (behind NAT) ↔ Cloud VPS (public IP)
- ✅ Homelab (private IP) ↔ Homelab (private IP on the same local network)
- ❌ Homelab (behind NAT) ↔ Friend's homelab (behind NAT) — requires a relay server
Automating with Uncloud
As your setup grows, managing subnet allocation for Docker networks (ensuring each gets a unique range like
10.200.1.0/24, 10.200.2.0/24) and updating WireGuard configs manually may become tedious quickly.
I built Uncloud, an open source clustering and deployment tool for Docker, to handle all the heavy lifting automatically. You can get the same result and much more with just a few commands.
Initialise a new cluster on your first machine:
uc machine init user@machine1
Add more machines to the cluster:
uc machine add user@machine2
uc machine add user@machine3
This is what these commands do:
- Create the
uncloudDocker network on each machine with unique subnets (10.210.0.0/24,10.210.1.0/24, etc.). - Generate WireGuard key pairs and distribute public keys across machines.
- Start a full mesh WireGuard network.
- Configure iptables rules for container communication.
- Make everything persistent across reboots.
Beyond the network setup, you also get:
- Multi-machine Docker Compose deployments with zero downtime.
- Built-in DNS server that resolves container IPs by their service names.
- Automatic HTTPS and reverse proxy configuration.
Check out the documentation for more information.
Alternative solutions
Before settling on the WireGuard approach, I evaluated several alternatives. Note that I only considered lightweight solutions suitable for Docker. Kubernetes and its CNI ecosystem deserve a separate discussion.
Docker Swarm overlay network
Docker Swarm includes built-in overlay networking. However, to use an overlay network, you need to run a Swarm cluster on all machines. This introduces additional complexity:
- Cluster nodes must maintain the quorum. Losing quorum impacts the functionality of overlay networks.
- Ports 2377, 7946, and 4789 must be exposed to untrusted networks (if connecting machines over the internet) for cluster management, node communication, and VXLAN overlay traffic.
- VXLAN traffic is unencrypted by default, requiring additional hardening with IPSec and firewalls.
- Every node must be publicly reachable. VXLAN fails if machines are behind NAT.
If these limitations are acceptable, an overlay network is a great option. Note that you can use an overlay network with regular containers without using any other Swarm features.
Flannel
Flannel is battle-tested in Kubernetes but can also be used with Docker. It supports multiple backends including VXLAN and WireGuard.
The main caveat is that Flannel requires running etcd as the datastore for coordination. Depending on your availability requirements, you may need to set up an etcd cluster with multiple nodes. This is not a problem if you're already using Kubernetes. But if you're just running a few Docker hosts, it might seem like overkill.
Tailscale
Tailscale makes WireGuard easy with automatic NAT traversal and key management, but it's not designed as a generic site-to-site VPN for connecting networks. Instead, it connects individual devices and provides identity-based access controls.
The recommended approach for using Tailscale with Docker is to connect each individual container to a Tailscale network. This means deploying an additional Tailscale container alongside every application container.
Tailscale's subnet router feature might work to expose Docker networks similar to our setup, but I haven't tested this approach.
Conclusion
That's it! Now you know how to securely connect Docker containers across multiple machines using WireGuard. The manual setup works great for a handful of machines that you don't need to change often, but configuration management becomes tedious as you scale.
If you don't want to mess with manual configuration, consider automation tools like Uncloud or evaluate if you need a full orchestration platform.
Feel free to reach out if you have any questions or suggestions. You can find me on X at @psviderski or check my GitHub profile psviderski for other contacts.